When clearing the cache, among other things, auto-complete data is also deleted. For this reason, if Outlook is used frequently, it is advisable to do this at least once a month. From our perspective, doing this assignment is fairly easy.
Outlook cache corruption is likely the cause of issues such as mail not arriving in your inbox or loading too slowly. While the cache speeds up the Outlook application’s loading time, it may become corrupted over time as a result of accumulation.
This can lead to a number of synchronization problems with the server and your system. You ought to think about cleaning the cache in order to fix it.
This is crucial since the program saves files for convenient access, but eventually, these same files may become the source of slowdowns.
This post will walk you through each stage of clearing the cache.
The instructions are relevant to Outlook for Microsoft 365, Outlook 2019, 2016, 2013, and 2010.
Delete the Outlook Cache

Emails, contacts, and other important data are not erased when the Outlook cache is removed. When you open Outlook, fresh cache files are created automatically.
After closing Outlook, save any work.
Type Windows key+R.
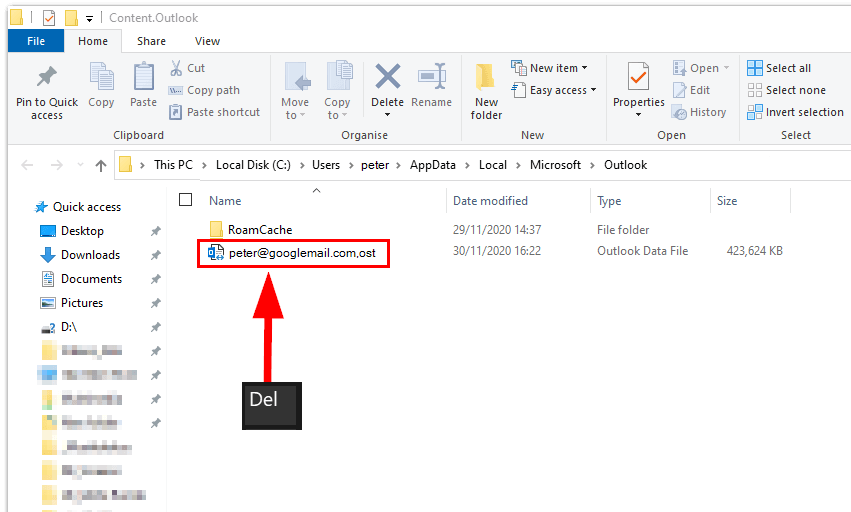
Press Enter after entering %localappdata%\Microsoft\Outlook in the Run dialog box.
Viewing the cache files requires double-clicking the RoamCache folder.
In case something goes wrong, you can restore the files by backing up the cache files to an external hard drive or another location.
Holding down the Shift key while choosing every file will cause the cache files to be removed. Once the files are highlighted, either right-click on them and choose Delete, or press the Delete key.
In the event that you are asked to confirm the deletion, click Yes.
Clear the Auto-Complete Cache

You can either entirely remove the auto-complete cache or disable auto-complete so that the cached data is not displayed if all you want to do is clean the auto-complete cache.
Select Options by going to the File tab.
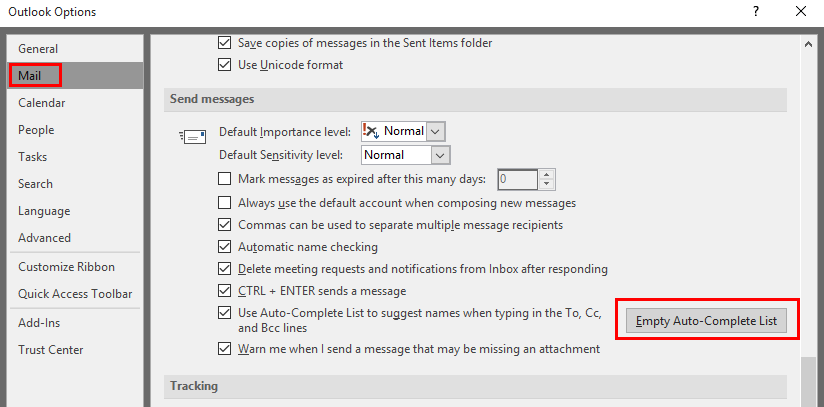
The Mail tab can be selected in the Outlook Options dialog box.
In order to disable autocomplete, navigate to the Send messages area. When you type in the To, Cc, and Bcc lines, uncheck the box next to Use Auto-Complete List to propose names.
To delete the auto-complete list without turning off the feature, choose Empty Auto-Complete List. Click the Yes option in the confirmation dialog box.
Click the OK button in the Outlook Options dialog box.
FAQ
In Outlook, how do I remove an address from my autocomplete list?
To remove an address from your Outlook autocomplete list, select X after highlighting the name in the autocomplete list and entering the address in the To field of a new message. Select People from the View Switcher in Outlook Online, pick a contact, click Edit, and then remove the address.
How do I get rid of emails in Outlook forever?
Press Shift+Delete while selecting the email, then choose Yes to confirm the permanent deletion of the message from Outlook. Right-click the folder and choose Empty Folder to permanently remove the contents of the Deleted Items folder.
How can I set Outlook to empty my trash automatically?
When you exit Outlook, go to File > Options > Advanced > Empty Deleted Items folders to set Outlook to empty the trash automatically.
Related Articles:
https://landscapeinsight.com/technology/how-to-stop-calls-on-iphone-without-blocking/71943/
https://landscapeinsight.com/technology/what-is-my-hotspot-password-android/71927/
Jessica is engaged in brand exposure at LandscapeInsight. She brings forth content that helps both the reader and brands based on research and trends. You can reach Jessica at –[email protected] or on Our website Contact Us Page.


